Containers
We spend a fair amount of time organizing and counting wells when writing Python protocols. This section describes the different ways we can access wells and groups of wells.
Labware Library
The Opentrons API comes with many common labware containers
built in. These containers can be loaded into you Python
protocol using the
containers.load()
method, and the specific name of the labware you need.
Check out this webpage to see a visualization of all the API’s current built-in containers.
Below are a list of some of the most commonly used containers in the API, as well as images for how they look.
If you are interested in using your own container that is not
included in the API, please take a look at how to create
custom containers using
containers.create(), or contact Opentrons Support.
Note
All names are case-sensitive, copying and pasting from this list into the protocol editor will ensure no errors are made.
Point
Use
point
when there is only one position per container, such as the
trash or a scale.
container.load('point', slot)
You can access the point position as
container.wells('A1')
or
container.wells(0).
Tipracks
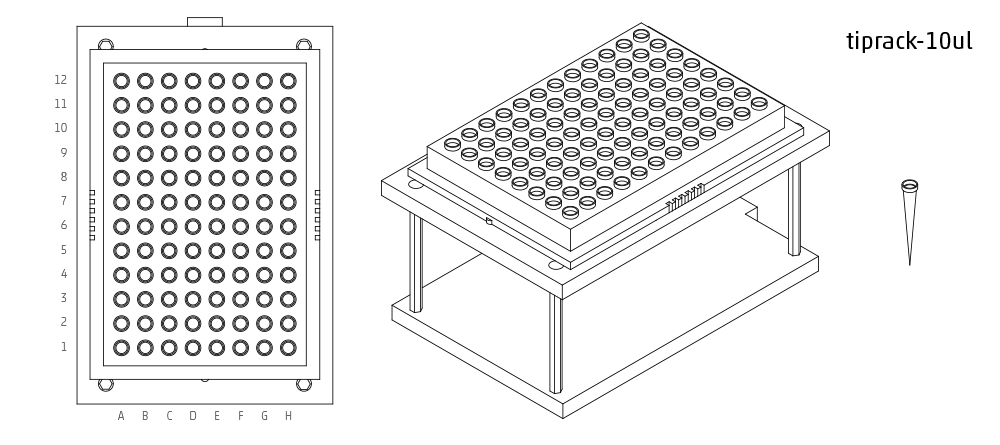
tiprack-10ul
Tip rack for a 10 uL pipette (single or 8-channel)
container.load('tiprack-10ul', slot)
Accessing Tips: single channel
['A1']-['H12'], 8-channel
['A1']-['A12']
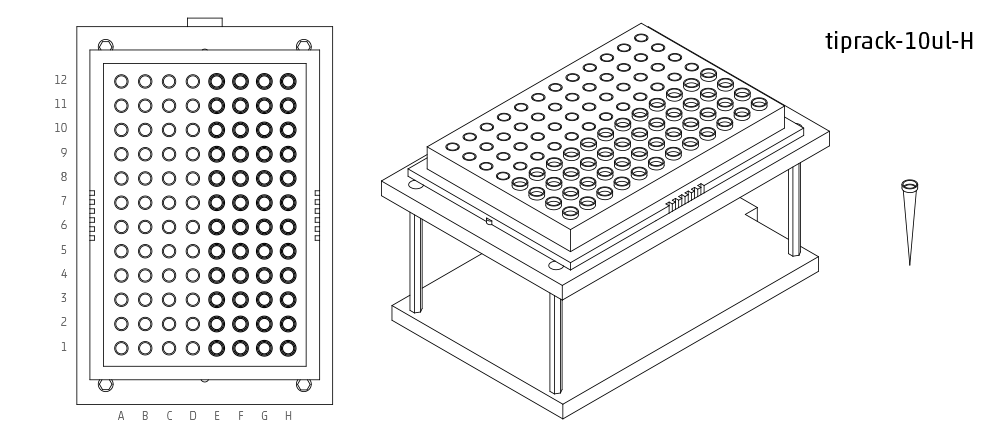
tiprack-10ul-H
Tip rack for a single channel 10 uL pipette when the pipette is in the center position. Set initial position to H1, and the pipette will use all the tips on the right hand side (E-H, 1-12)
container.load('tiprack-10ul-H', slot)
Accessing Tips: single channel
['E-H,
                        1-12']
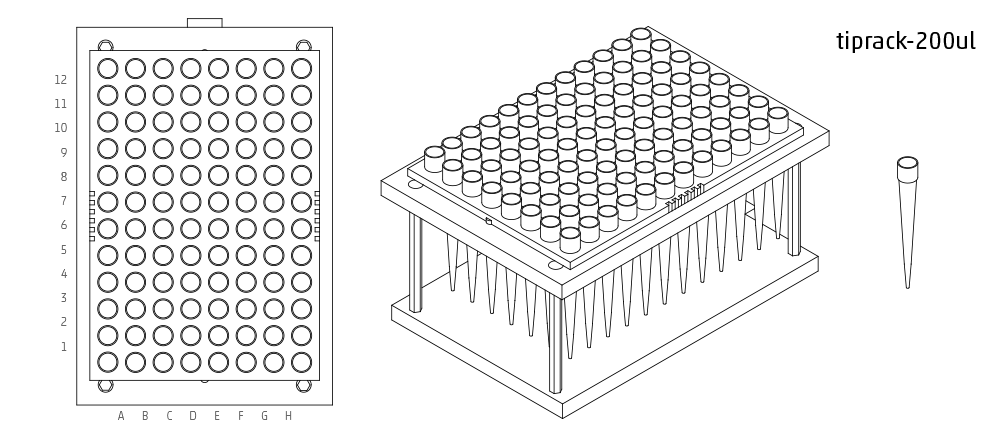
tiprack-200ul
Tip rack for a 200 or 300 uL pipette (single or 8-channel)
container.load('tiprack-200ul', slot)
Accessing Tips: single channel
['A1']-['H12'], 8-channel
['A1']-['A12']
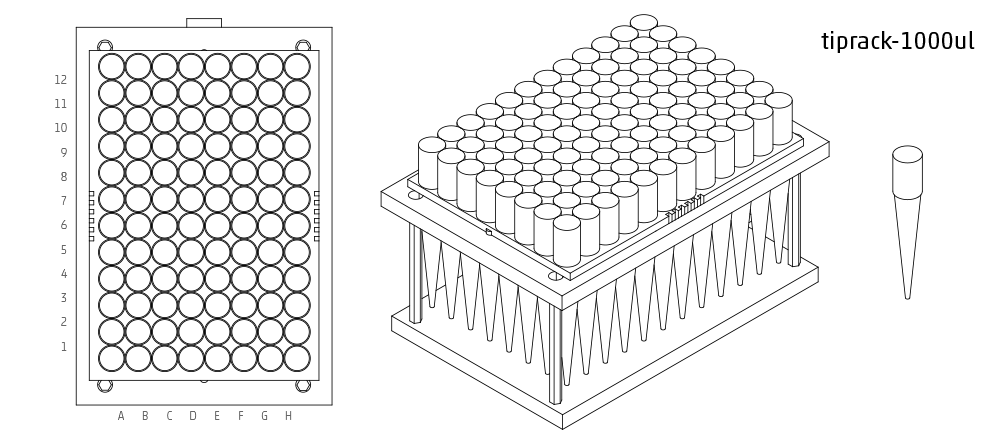
tiprack-1000ul
Tip rack for a 1000 uL pipette (single or 8-channel)
container.load('tiprack-1000ul', slot)
Accessing Tips: single channel
['A1']-['H12'], 8-channel
['A1']-['A12']
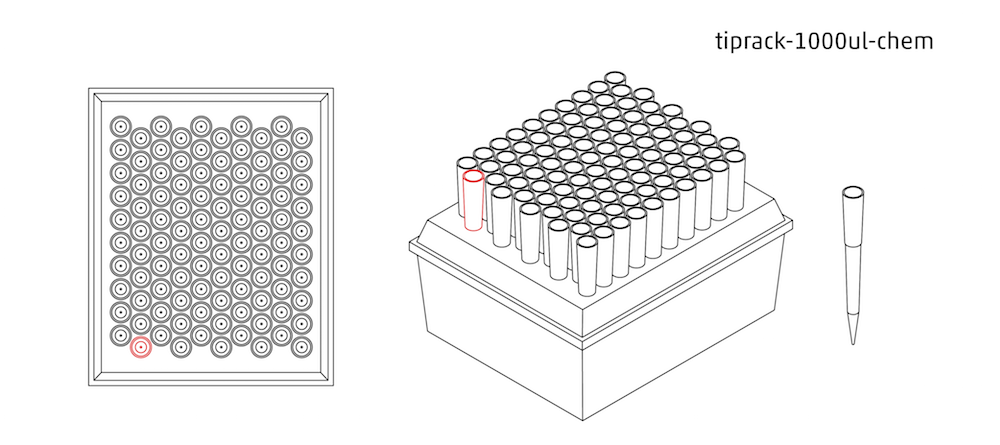
tiprack-1000ul-chem
Tip rack for 1000ul chem (10x10)
container.load('tiprack-1000ul-chem', slot)
Accessing Tips: single channel
[0]-[99]
Troughs
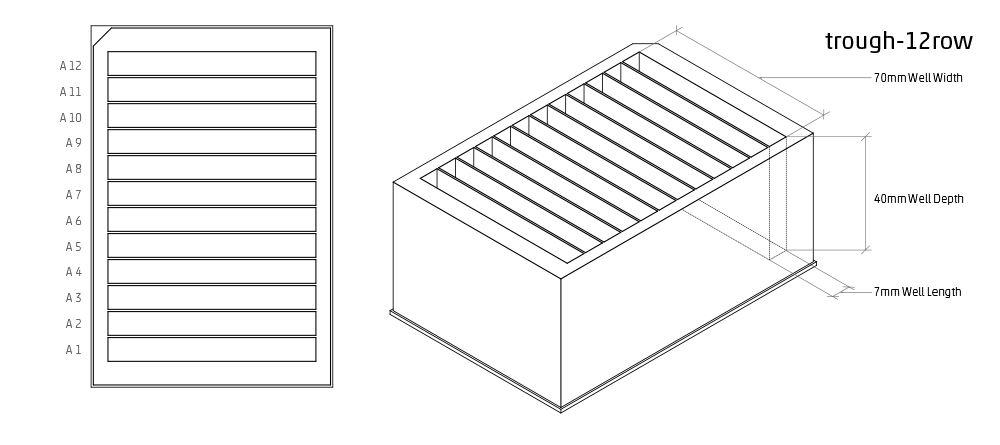
trough-12row
12 row reservoir
container.load('trough-12row', slot)
Accessing Rows: single channel
['A1']-['A12'], 8-channel
['A1']-['A12']
Tube Racks
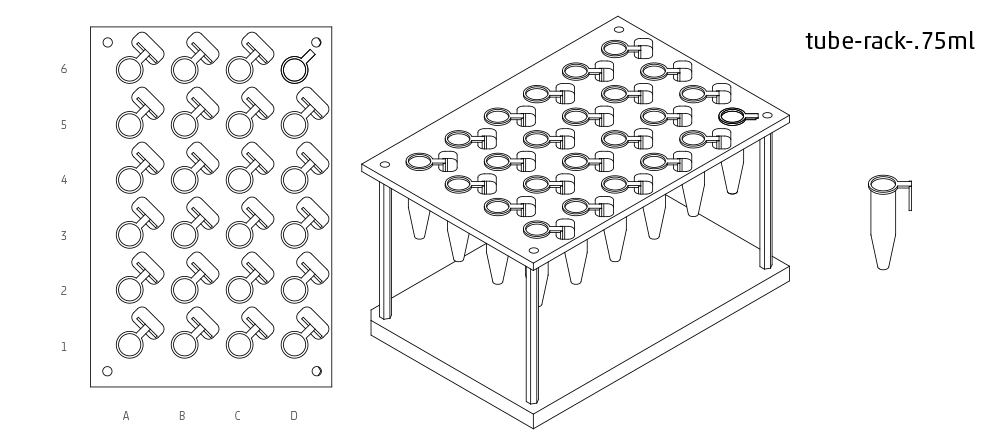
tube-rack-.75ml
4x6 rack that holds .75 mL microcentrifuge tubes (A1, A1-D6)
container.load('tube-rack-.75ml', slot)
Accessing Tubes: single channel
['A1']-['D6']
tube-rack-2ml
4x6 rack that holds 1.5 mL microcentrifuge tubes and 2 mL microcentrifuge tubes
container.load('tube-rack-2ml', slot)
Accessing Tubes: single channel
['A1']-['D6']

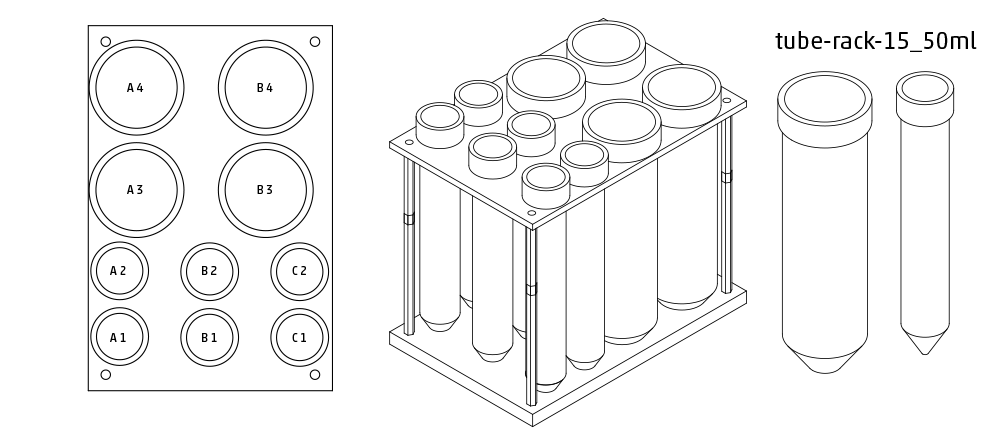
tube-rack-15_50ml
rack that holds 6 15 mL tubes and 4 50 mL tubes
container.load('tube-rack-15_50ml', slot)
Accessing Tubes: single channel
['A1']-['A3'],
                        ['B1']-['B3'],
                        ['C1']-['C2'],
                        ['D1']-['D2']
Plates
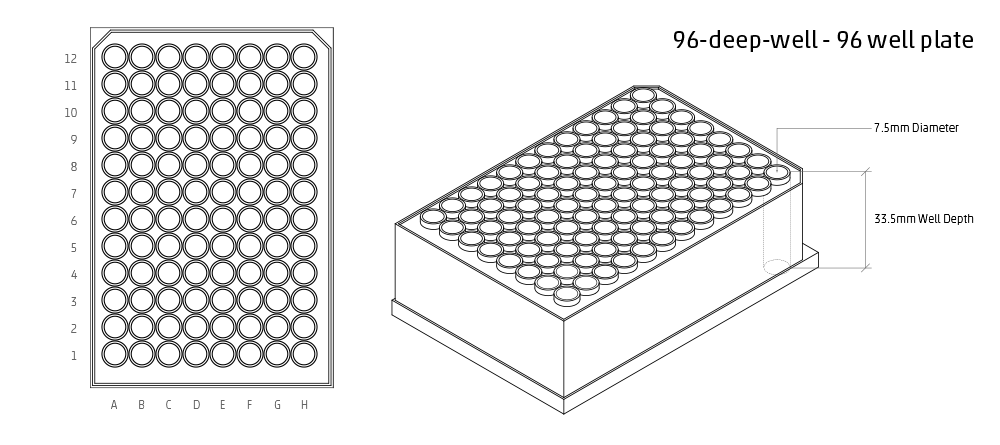
96-deep-well
See dimensions in diagram below.
container.load('96-deep-well', slot)
Accessing Wells: single channel
['A1']-['H12'], 8-channel
['A1']-['A12']
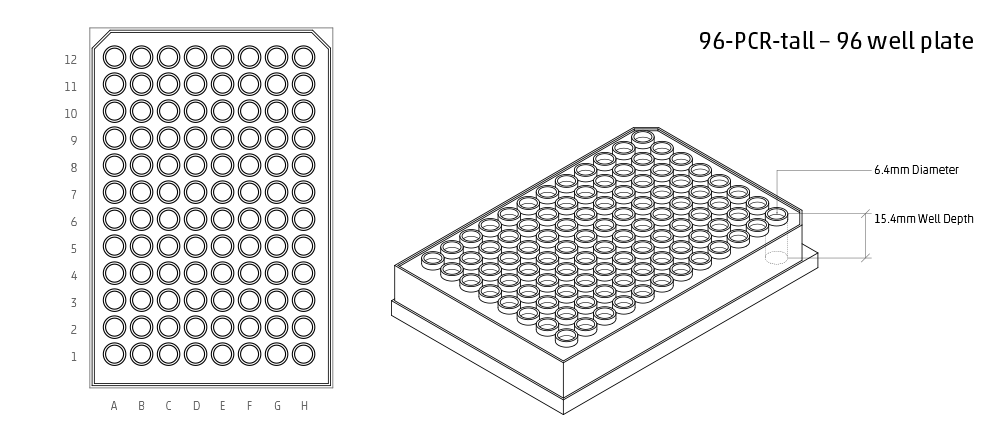
96-PCR-tall
See dimensions in diagram below.
container.load('96-PCR-tall', slot)
Accessing Wells: single channel
['A1']-['H12'], 8-channel
['A1']-['A12']
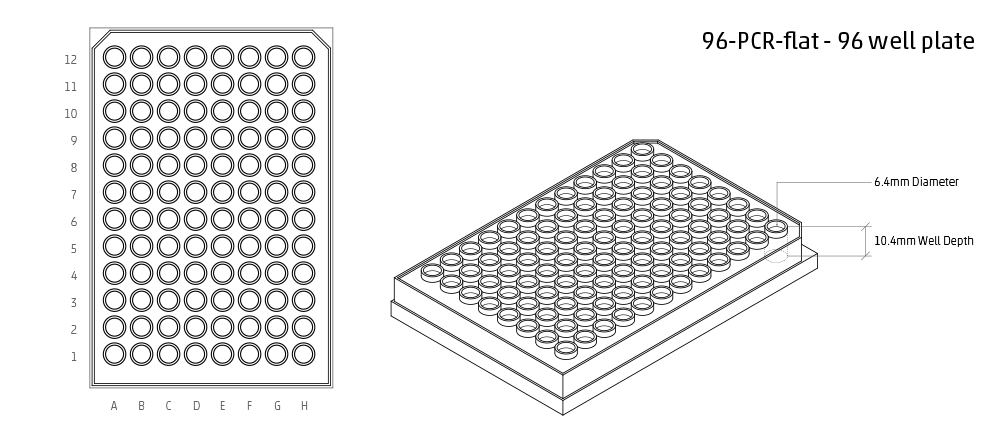
96-PCR-flat
See dimensions in diagram below.
container.load('96-PCR-flat', slot)
Accessing Wells: single channel
['A1']-['H12'], 8-channel
['A1']-['A12']
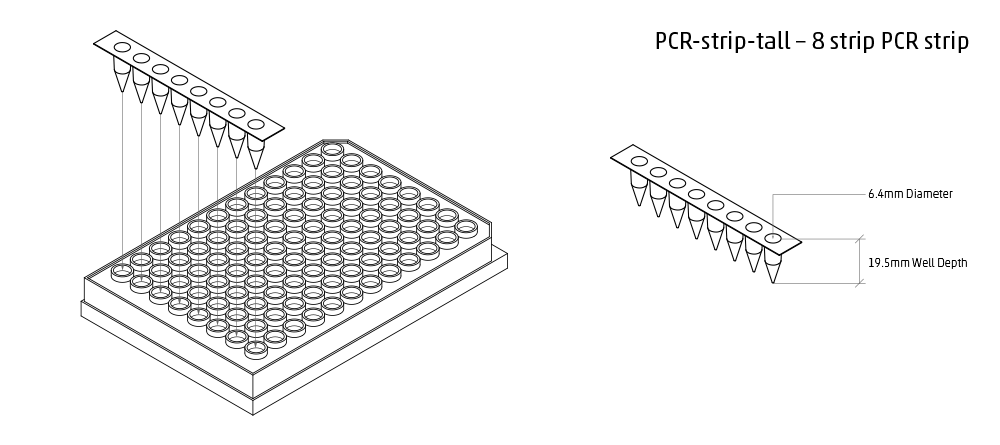
PCR-strip-tall
See dimensions in diagram below.
container.load('PCR-strip-tall', slot)
Accessing Wells: single channel
['A1']-['A8'], 8-channel
['A1']
384-plate
See dimensions in diagram below.
container.load('384-plate', slot)
Accessing Wells: single channel
['A1']-['P24'], multi-channel
['A1']-['A24]

Containers
The containers module allows you to load common labware into your protocol. Go here to see a visualization of all built-in containers.
'''
Examples in this section require the following
'''
from opentrons import containers
List
Once the container module is loaded, you can see a list of
all containers currently inside the API by calling
containers.list()
containers.list()
Load
Labware is loaded with two arguments: 1) the container type, and 2) the deck slot it will be placed in on the robot.
p = containers.load('96-flat', 'B1')
A third optional argument can be used to give a container a unique name.
p = containers.load('96-flat', 'B1', 'any-name-you-want')
Unique names are useful in a few scenarios. First, they allow the container to have independant calibration data from other containers in the same slot. In the example above, the container named ‘any-name-you-want’ will assume different calibration data from the unnamed plate, even though they are the same type and in the same slot.
Note
Calibration data refers to the saved positions for each container on deck, and is a part of the Opentrons App calibration procedure.
Names can also be used to place multiple containers in the same slot all at once. For example, the flasks below are all placed in slot D1. So in order for the Opentrons API to tell them apart, we have given them each a unique name.
fa = containers.load('T25-flask', 'D1', 'flask_a')
fb = containers.load('T25-flask', 'D1', 'flask_b')
fc = containers.load('T25-flask', 'D1', 'flask_c')
Create
In addition to the default containers that come with the Opentrons API, you can create your own custom containers.
Through the API’s call containers.create(), you can create simple grid containers, which consist of circular wells arranged in columns and rows.
containers.create(
    '3x6_plate',                    # name of you container
    grid=(3, 6),                    # specify amount of (columns, rows)
    spacing=(12, 12),               # distances (mm) between each (column, row)
    diameter=5,                     # diameter (mm) of each well on the plate
    depth=10)                       # depth (mm) of each well on the plate
When you create your custom container, then it will be saved for later use under the name you’ve given it. This means you can use containers.load() to use the custom container you’ve created in this and any future protocol.
custom_plate = containers.load('3x6_plate', 'D1')

for well in custom_plate.wells():
    print(well)
will print out...
<Well A1>
<Well B1>
<Well C1>
<Well A2>
<Well B2>
<Well C2>
<Well A3>
<Well B3>
<Well C3>
<Well A4>
<Well B4>
<Well C4>
<Well A5>
<Well B5>
<Well C5>
<Well A6>
<Well B6>
<Well C6>
Accessing Wells
Individual Wells
When writing a protocol using the API, you will be spending most of your time selecting which wells to transfer liquids to and from.
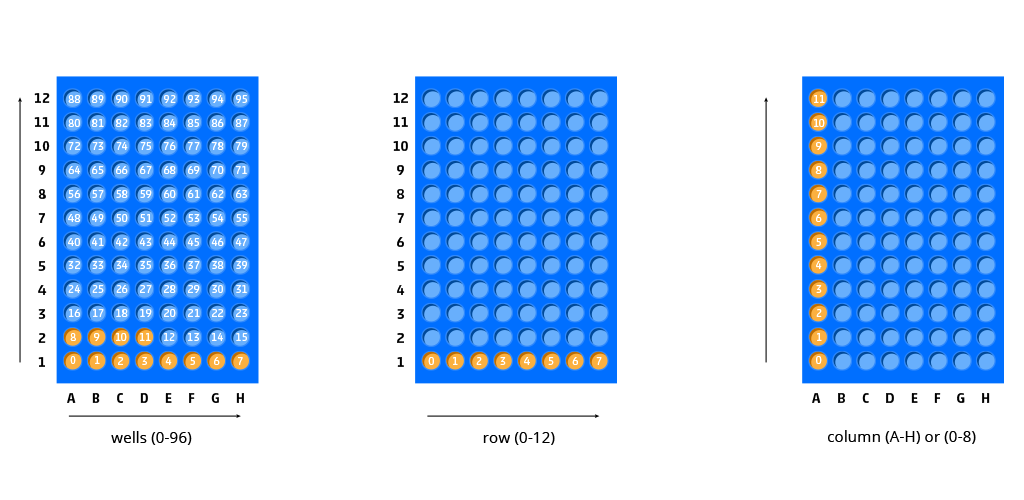
The OT-One deck and containers are all set up with the same coordinate system - numbered rows and lettered columns.
'''
Examples in this section expect the following
'''
from opentrons import containers

plate = containers.load('96-flat', 'A1')
Wells by Name
Once a container is loaded into your protocol, you can
easily access the many wells within it using
wells()
method.
wells()
takes the name of the well as an argument, and will return
the well at that location.
plate.wells('A1')
plate.wells('H12')
Wells by Index
Wells can be referenced by their “string” name, as demonstrated above. However, they can also be referenced with zero-indexing, with the first well in a container being at position 0.
plate.wells(0)   # well A1
plate.wells(95)  # well H12
plate.wells(-1)  # well H12 (Python let's you do this)
Columns and Rows
A container’s wells are organized within a series of
columns and rows, which are also labelled on standard
labware. In the API, columns are given letter names ('A'
through
'H'
for example) and go left to right, while rows are given
numbered names ('1'
through
'8'
for example) and go from front to back. You can access a
specific row or column by using the
rows()
and
cols()
methods on a container. These will return all wells within
that row or column.
column = plate.cols('A')
row = plate.rows('1')

print('Column "A" has', len(column), 'wells')
print('Row "1" has', len(row), 'wells')
will print out...
Column "A" has 12 wells
Row "1" has 8 wells
The
rows()
or
cols()
methods can be used in combination with the
wells()
method to access wells within that row or column. In the
example below, both lines refer to well
'A1'.
plate.cols('A').wells('1')
plate.rows('1').wells('A')
Multiple Wells
If we had to reference each well one at a time, our protocols could get very very long.
When describing a liquid transfer, we can point to groups of wells for the liquid’s source and/or destination. Or, we can get a group of wells that we want to loop through.
'''
Examples in this section expect the following
'''
from opentrons import containers

plate = containers.load('96-flat', 'B1')
Wells
The
wells()
method can return a single well, or it can return a list
of wells when multiple arguments are passed.
Here is an example or accessing a list of wells, each specified by name:
w = plate.wells('A1', 'B2', 'C3', 'H12')

print(w)
will print out...
<WellSeries: <Well A1><Well B2><Well C3><Well H12>>
Multiple wells can be treated just like a normal Python list, and can be iterated through:
for w in plate.wells('A1', 'B2', 'C3', 'H12'):
    print(w)
will print out...
<Well A1>
<Well B2>
<Well C3>
<Well H12>
Wells To
Instead of having to list the name of every well, we can
also create a range of wells with a start and end point.
The first argument is the starting well, and the
to=
argument is the last well.
for w in plate.wells('A1', to='H1'):
    print(w)
will print out...
<Well A1>
<Well B1>
<Well C1>
<Well D1>
<Well E1>
<Well F1>
<Well G1>
<Well H1>
Not only can we get every well between the start and end
positions, but we can also set the
step=
size. The example below will access every 2nd well between
'A1'
and
'H':
for w in plate.wells('A1', to='H1', step=2):
    print(w)
will print out...
<Well A1>
<Well C1>
<Well E1>
<Well G1>
These lists of wells can also move in the reverse
direction along your container. For example, setting the
to=
argument to a well that comes before the starting position
is allowed:
for w in plate.wells('H1', to='A1', step=2):
    print(w)
will print out...
<Well H1>
<Well F1>
<Well D1>
<Well B1>
Wells Length
Another way you can create a list of wells is by
specifying the length= of the well list you need, in
addition to the starting point. The example below will
return eight wells, starting at well
'A1':
for w in plate.wells('A1', length=8):
    print(w)
will print out...
<Well A1>
<Well B1>
<Well C1>
<Well D1>
<Well E1>
<Well F1>
<Well G1>
<Well H1>
And just like before, we can also set the
step=
argument. Except this time the example will be accessing
every 3rd well, until a total of eight wells have been
found:
for w in plate.wells('A1', length=8, step=3):
    print(w)
will print out...
<Well A1>
<Well D1>
<Well G1>
<Well B2>
<Well E2>
<Well H2>
<Well C3>
<Well F3>
You can set the step= value to a negative number to move in the reverse direction along the container:
for w in plate.wells('H11', length=8, step=-1):
    print(w)
will print out...
<Well H11>
<Well G11>
<Well F11>
<Well E11>
<Well D11>
<Well C11>
<Well B11>
<Well A11>
Columns and Rows
Columns and Rows The same arguments described above can be
used with
rows()
and
cols()
to create lists of rows or columns.
Here is an example of iterating through rows:
for r in plate.rows('2', length=3, step=-2):
    print(r)
will print out...
<WellSeries: <Well A2><Well B2><Well C2><Well D2><Well E2><Well F2><Well G2><Well H2>>
<WellSeries: <Well A12><Well B12><Well C12><Well D12><Well E12><Well F12><Well G12><Well H12>>
<WellSeries: <Well A10><Well B10><Well C10><Well D10><Well E10><Well F10><Well G10><Well H10>>
And here is an example of iterating through columns:
for c in plate.cols('B', to='F', step=2):
    print(c)
will print out...
<WellSeries: <Well B1><Well B2><Well B3><Well B4><Well B5><Well B6><Well B7><Well B8><Well B9><Well B10><Well B11><Well B12>>
<WellSeries: <Well D1><Well D2><Well D3><Well D4><Well D5><Well D6><Well D7><Well D8><Well D9><Well D10><Well D11><Well D12>>
<WellSeries: <Well F1><Well F2><Well F3><Well F4><Well F5><Well F6><Well F7><Well F8><Well F9><Well F10><Well F11><Well F12>>
Slices
Containers can also be treating similarly to Python lists, and can therefore handle slices.
for w in plate[0:8:2]:
    print(w)
will print out...
<Well A1>
<Well C1>
<Well E1>
<Well G1>
The API’s containers are also prepared to take
string values for the slice’s
start
and
stop
positions.
for w in plate['A1':'A2':2]:
    print(w)
will print out...
<Well A1>
<Well C1>
<Well E1>
<Well G1>
for w in plate.cols['B']['1'::2]:
    print(w)
will print out...
<Well B1>
<Well B3>
<Well B5>
<Well B7>
<Well B9>
<Well B11>